
Mission to Minerva (Breakdown)
Introduction
I have moved DCC packages from Maya to Houdini since starting at Alt.vfx two years ago. It was a bit of a rocky start but once I got my head around the program there was no looking back.
This year I decided to enter Kitbash3D’s 2022 CG challenge, Mission to Minerva (https://kitbash3d.com/pages/minerva ). I learnt quite a lot over the last couple of years, particularly in procedural environment design. I felt the KB3D challenge was a perfect way to utilise my new skills into my own personal project. I wanted to focus on building a large environment in a single shot that told a interesting story. It was a quick turn around with just over a month to complete the challenge, and I only touched it after work or on weekends. Overall, I was happy with the final result.
Getting Started
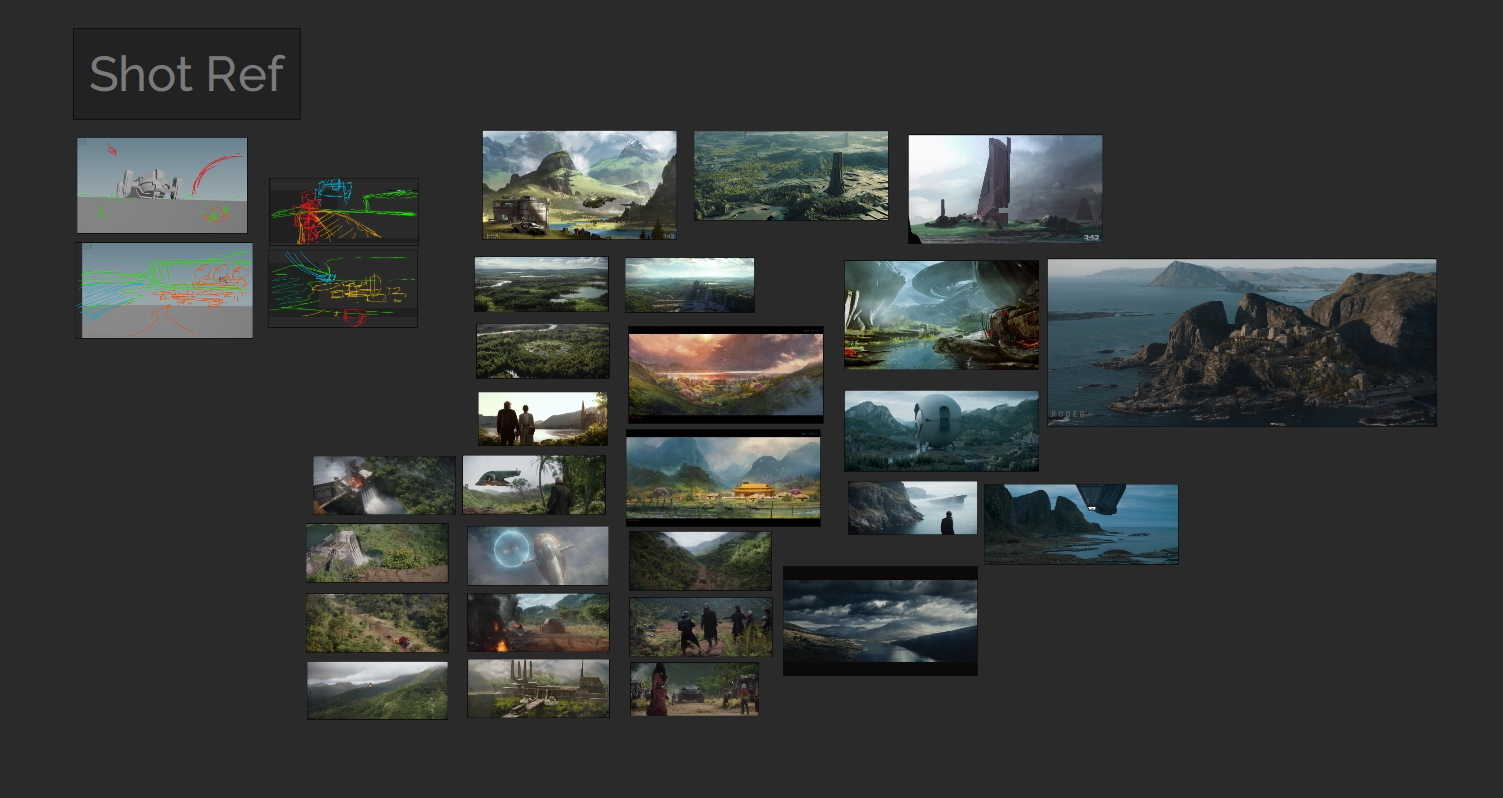
First thing I did was gather references. Unfortunately, I had no idea what I was going to build, so I went on https://film-grab.com/ for some inspiration. A lot of the references I saved were grassy fields, and forests with naturalistic lighting. So that seemed like the route I wanted to take.
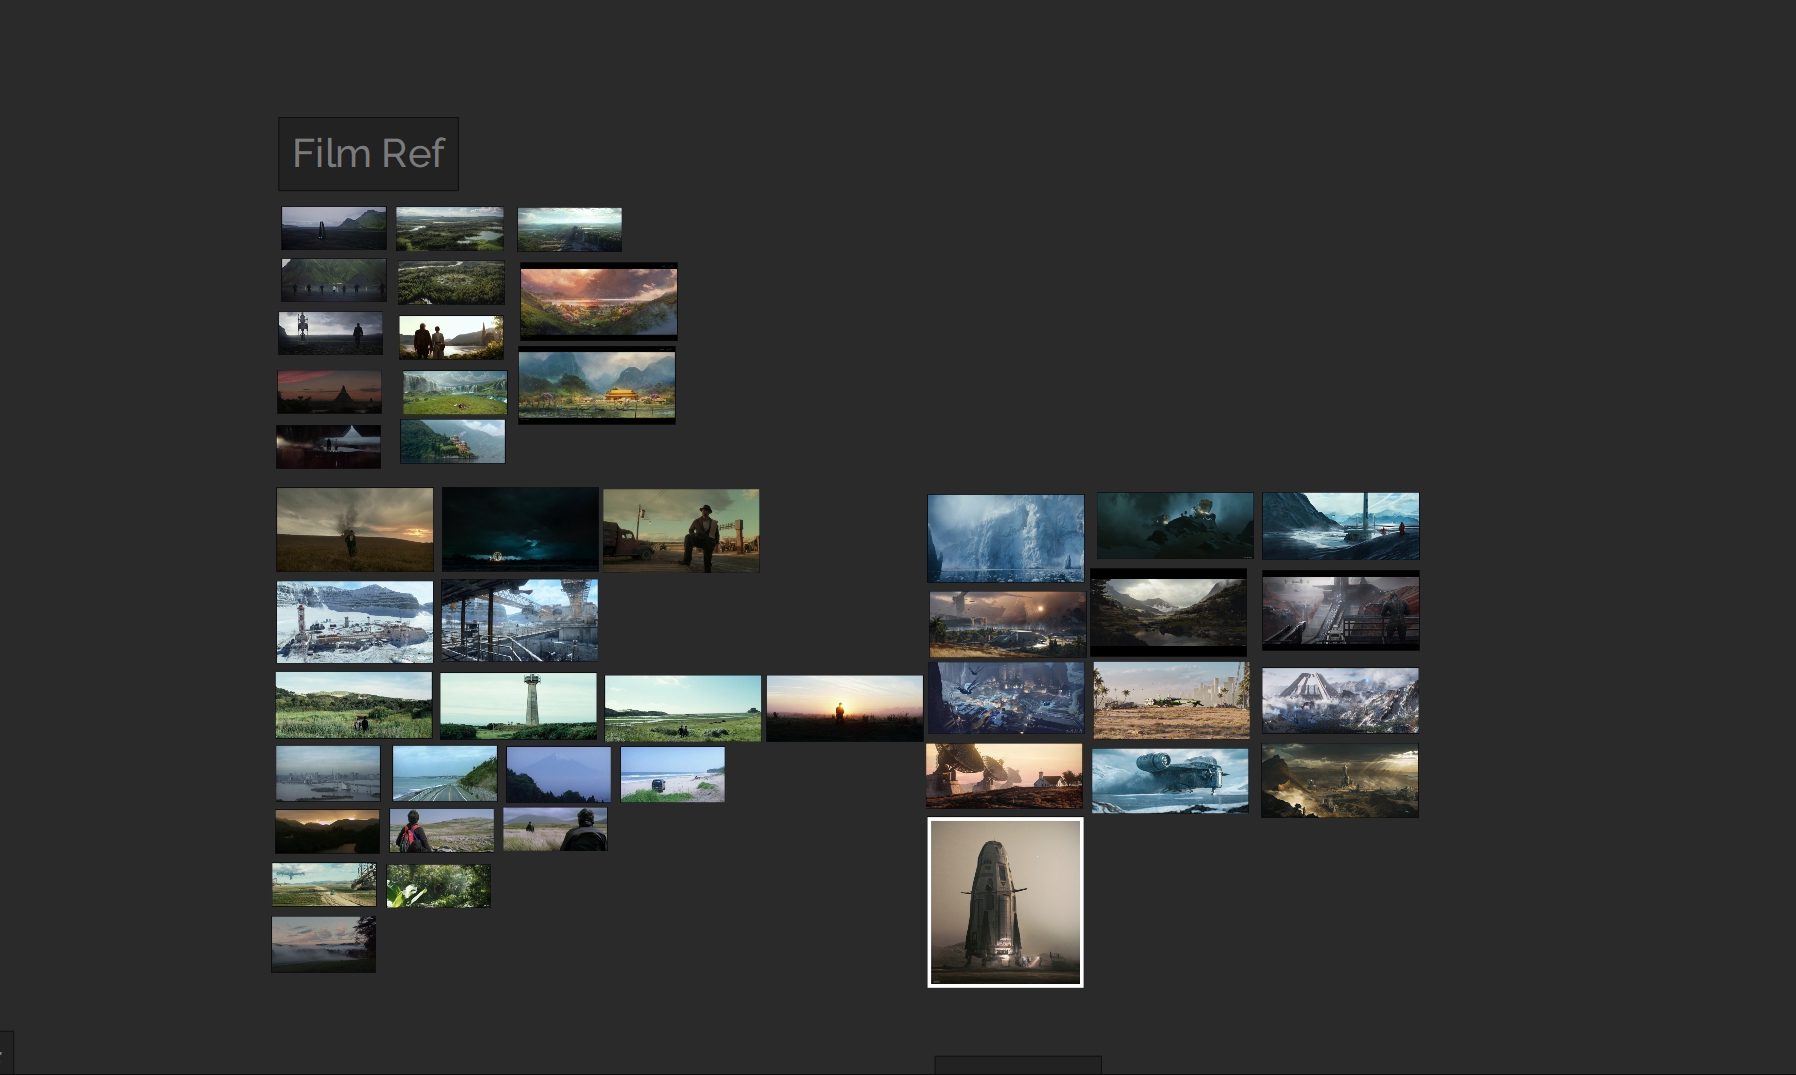
I then collected more specific references. I collected a lot from Star Wars, Dune and Shang-Chi. I really enjoyed the shot from The Mandalorian (S01E04 - Sanctuary) where the Razor Crest flew above the trees and prepared to land. And the shot in Dune when the messengers arrived on Caladan was also very inspiring. I loved the Nordic look of the landscape in Dune, with the rocky mountains and dense trees. I decided to combine these ideas into my project.
Specific references

The Mandalorian S01 E04 - Sanctuary
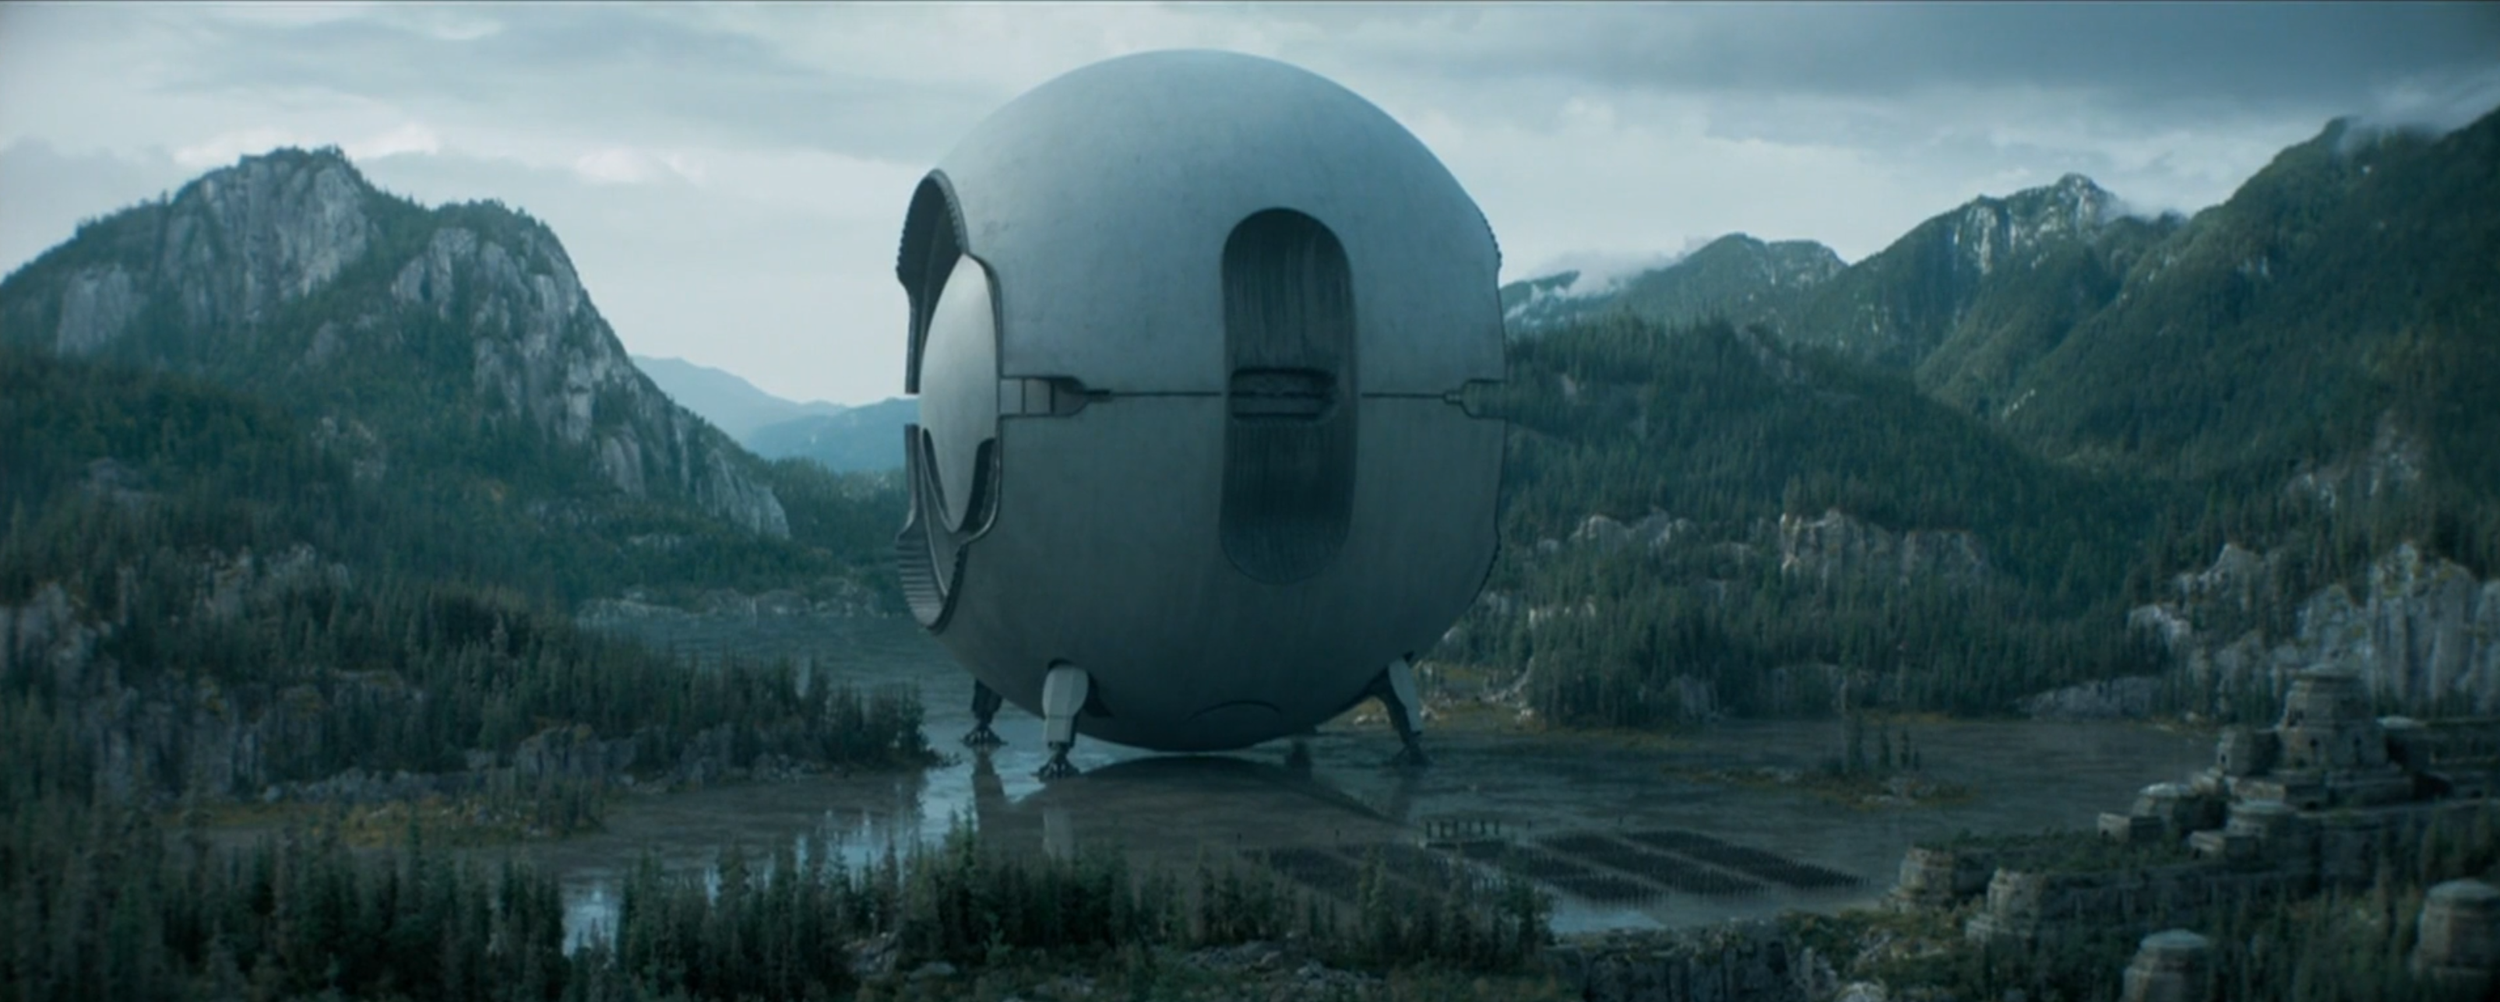
Dune (2021) - Arriving on Caladan
USD Testing
Before officially starting, I gave myself a week to R&D USD. SideFX and the Houdini community have been pushing the use of USD and Solaris and I thought this might be a great project to understand it. I played around with Solaris and other people’s Solaris scenes. These included Animal Logic’s Alab (https://animallogic.com/alab/ ) and SideFx’s Renderman Tutorial scene (https://www.sidefx.com/tutorials/houdini-solaris-for-renderman/ ). Unfortunately I decided to not pursue USD. I thought it was a fantastic tool and could rival Clarisse with the speed of the Hydra delegate. However, I thought it would be better to invest as much time being creative rather than ironing out technical issues. I think if I were to build a project using Solaris, it would have to be much smaller first.
Blocking
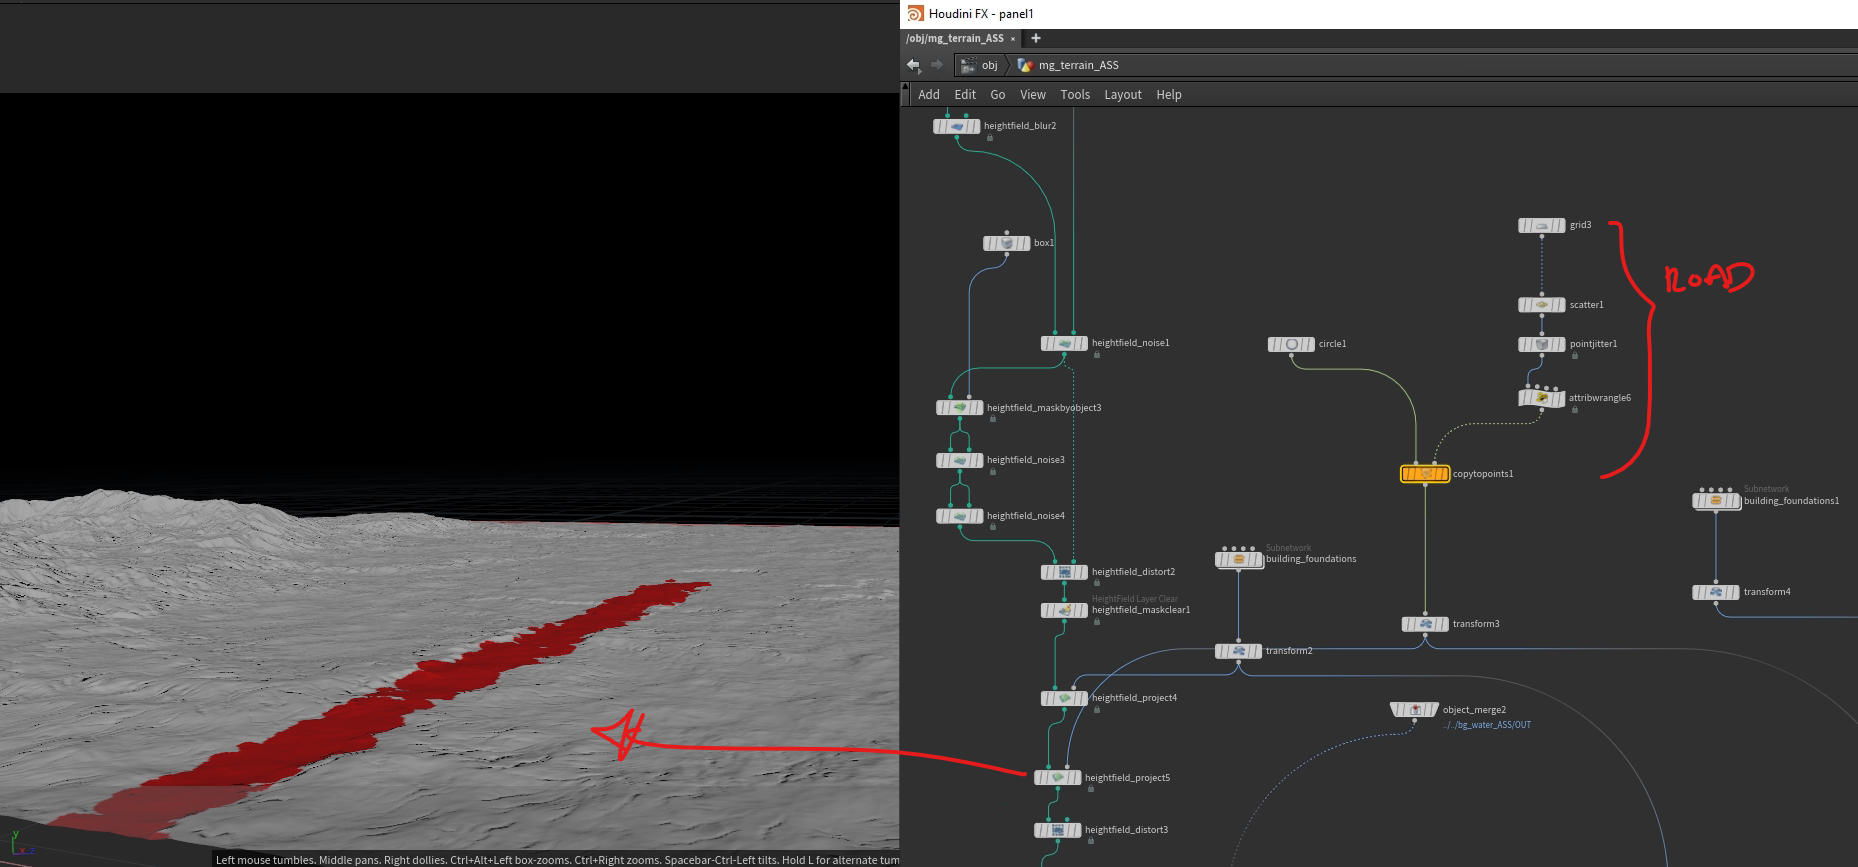
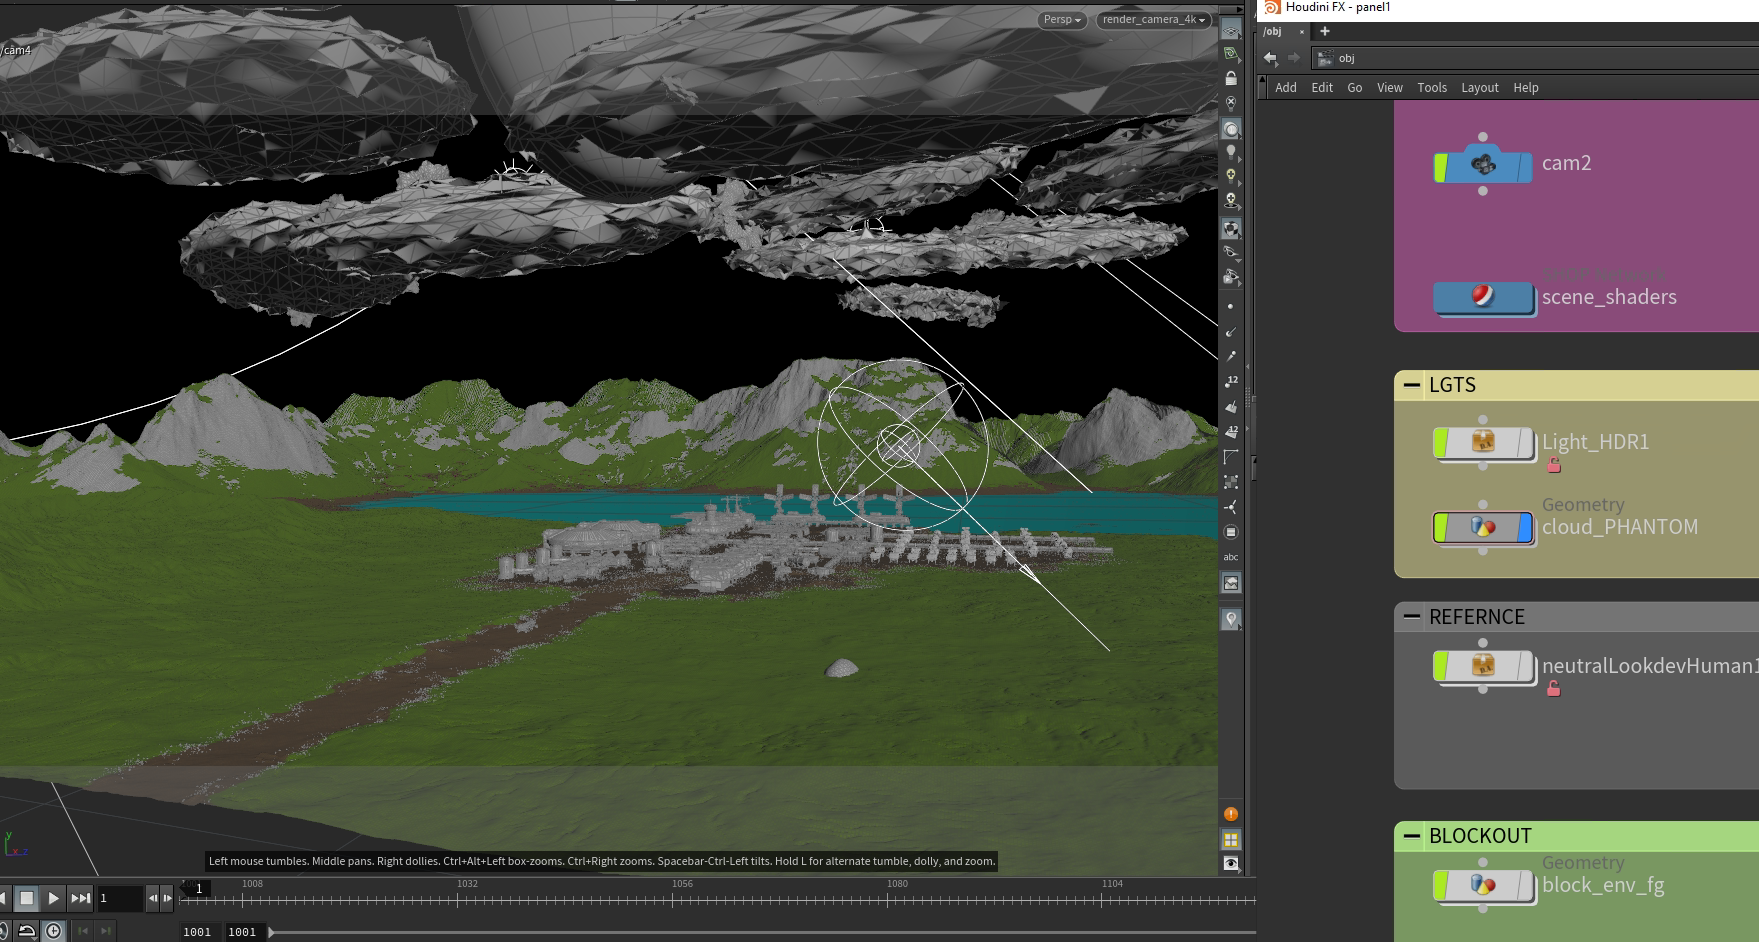
Once the technical side was sorted, it was time to block out the scene. This was all done in Houdini using cubes, grids, simple heightfields and the provided Minerva kit from KB3D. I used a simple curve with a carve node to animate the ship. Whilst blocking, I realised I wanted to have another subject in the scene that the explorers were studying. I was initially thinking of an alien structure in the water. At this stage it was just a pink cube.
Originally I had the camera pan from a grassy field in the foreground to the base below - this idea was scrapped early on.
After a few iterations, I changed the alien subject to be an alien ship floating above the lake. I still didn’t quite know if it was final so I left it as a giant sphere. It kind of reminded me of the ships from the film Arrival (2016).
Heightfields
Once I was happy with the blockout, it was time to iterate everything. I started off with the terrain using Houdini Heightfields. The bg heightfield was relatively simple with a few hf noises and distorts to break it up. The fg terrain had a little more finesse but otherwise it was just masking and projecting certain areas. I made the environment as procedural as possible. I set it up in a way where I could move the Minerva kit around the scene and the heightfield will automatically flatten the base area. The road was a simple grid with a scatter of circles on it. This made variation along the edges.


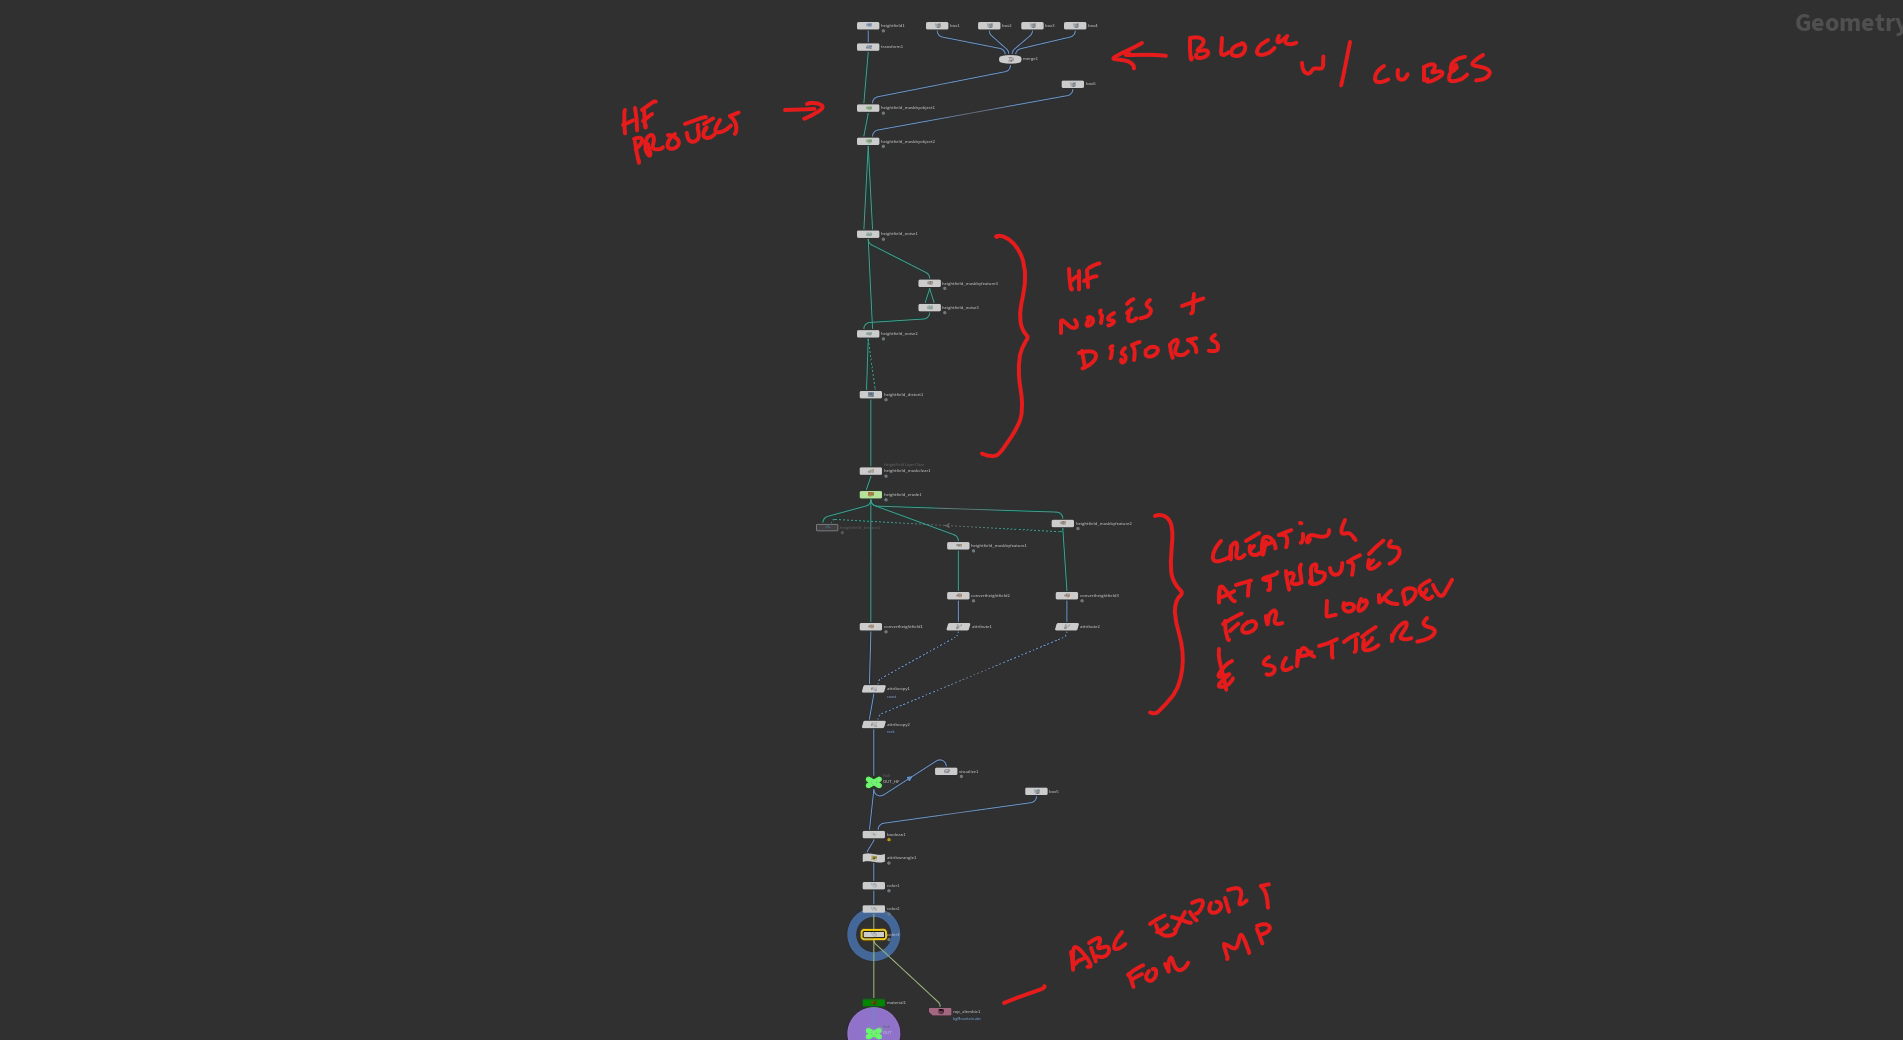
Scattering and Instancing
Once the terrain was in a good place, I started building my element library. I do this by building it all in a single subnet. This just makes it easier for me to know that all the trees and bushes are in the one spot. I had them as a separate geo within the subnet. This means I can render proxy files for Arnold (.ass) and scatter that to save ram.
I then instanced my elements. I would use the slope attributes from the HF to drive the density of trees and bushes. This meant that if the terrain was too steep, trees would not spawn there. I also used a number of varied attribute noises to break up the density. This was simply done by multiplying the noise attribute with the density attribute in VEX.
I was originally using the instance node to scatter everything. However, I realised that instance nodes don’t build ass files so I had to object merge them into a geo node, and add an instance parameter to that. There are a few issues doing it this way, including trees rendering at the centre of the scene. However, it saved ram usage overall and reduced the cook time when rendering.


Lighting
Originally, I wanted to replicate the lighting from the Mandalorian episode I referenced. However, the first lighting and comp pass didn’t fit the mysterious feeling of the floating alien object. It was way too warm.


I went back to my references and found an artwork by Yen Chen (https://www.artstation.com/artwork/g85BAE) with some beautiful cloud coverage over some Scottish hills. I loved the gaps in the clouds the made pockets of sun beam through. So I decided to investigate making my own clouds in Houdini.
Clouds
This was the first time building clouds. I ended up using a sphere with a mountain SOP as the main shape and scattering smaller spheres with mountain SOPs over it. I quickly built a controller that adjusted scale, rotation, density and seeds. I then duplicated the setup and adjusted the controller parameters to get different results. These went through a cloud node and some cloud noise before caching as a vdb. I cached the vdbs using $OS and relative referenced the export to Arnold Volume nodes. This way I just duplicated the Arnold volume node and it would automatically update with the correct cache. Arnold Volumes also create smaller ass files before rendering than if you rendered it from a geo node.
I scattered the clouds that were far away onto a grid (with a mountain SOP to get height variation). The closer clouds were individually placed. The transform of the clouds also drove a proxy version for the viewport and for shadows in the beauty. I tried my best to keep render times and ram usage down.
I would love to explore clouds a bit more for my next project. In particular, certain cloud types and formations. I thought my clouds were pretty obvious that they’re instanced and I felt it needed more realism.


Handling the Kit in Houdini and Arnold
The Minerva kit comes with Mantra shaders when you download the Houdini project scene. These are also material linked via groups. Unfortunately, my Python skills are not advanced enough to code something that automatically builds Arnold shaders based on the Mantra shaders. So instead I used relative references and $OS to link the textures to the Arnold Shaders. I built a standard template first, then all I had to do was duplicate the template and make sure the shader names matched the ones from Mantra. It was a a lot of Ctrl+c and Ctrl+v but it was going to be much faster than learning python. I think I’d still prefer to learn Python but time was not on my side for this project.

I realised that the models have a high poly count. This would slow my viewport down while doing layout. Therefore, I built a switch to toggle between high poly and a cached poly reduced version. There were quite a few buildings to cache, so I used a simple TOPnet to get them all cached while I was doing something else.

Render Setup
The ROP setups weren’t too crazy. Everything was rendered at 2k with medium samples. The ship was being animated right at the end by Conor Goodchild (https://www.linkedin.com/in/conor-goodchild-0aa714173/ ) so I had to render everything first and render the ship separately.

Extra Tweaks
After a first render pass, I felt the alien object also didn't feel grand enough. I played around with the scale and made it a lot larger - going for that “holy shit!” vibe. I then adjusted the camera to make the alien ship the focus.
However, after some feedback and comp treatment, I felt the Minerva base should be more present in the shot. So I reverted back to an old camera and adjusted the animation slightly. This made it look as though the base is the subject at the start of the shot but then reveal the mysterious alien ship arriving.
Compositing
Due to the time constraints and short render window, I decided to get most of the atmospherics and colour finessed in Nuke.
The background is a simple gradient with some blurred clouds disjointed-over. I realised the rendered bg mountains were not making the shot feel large enough. I decided duplicate it, project it onto a card and then translate it back. The clouds, alien ship and rendered bg mountains were merged over next. The bg mountains had quite a lot of noise from the render so I ended up re-projecting a still frame of it onto the original geo from Houdini.

The main beauty pass had some matte painting work done in Photoshop to add a bit more detail into the rocky areas of the mountain. There was also quite a lot of noise coming from the instanced trees so I ran a x_denoise through certain aovs. Overall, it did a great job but there is still a bit of buzzing in areas. After the tech fixes, I graded the beauty to match the original references from Yen Chen and Dune.

The ship, 3d atmosphere and fog were then merged over. There was a bit of clean up work done near the end. And finally some fun comp treatment including, flares, chromatic aberration, and a final grade.

Conclusion
Overall, this was a super fun project. I do wish I had an extra week to add some rolling clouds over the mountain to give it a better sense of scale. I would have also liked to add some dust getting kicked up from the rover. And one more polish pass on everything would have been the cherry on the cake.
I learnt so much from this project and look forward to doing another one soon (maybe in Solaris). Please email me if you have any questions.


